Adobe Photoshop, is one of the most used photo editing software. One of the features of this software allows converting of image sequence to video.
Most current versions, apart from photos, allow you to generate a video as well and do some basic video operation. One of those, is generating a video from an image sequence.
In our case we convert a sequence of transparent .png photos into a video.
You can take the sequence from this link: https://techvideostack.com/subscribe-button-design-and-animation-in-davinci-resolve-16-bonus-free-green-screen-button-button-animation/
When importing, make sure to check the ‘Image Sequence’ check box, so that you get the whole sequence.
Next, you choose the frame rate of the video that you want to generate.
You can perform all of the video operations in the ‘Timeline’ window, within Adobe Photoshop. If you ‘Timeline’ windows is not visible, make it visible by clicking the ‘Timline’ option in the Window drop down menu of Photoshop.

If you play the animation in the timeline, you will see that a video is generated from the .png image sequence.
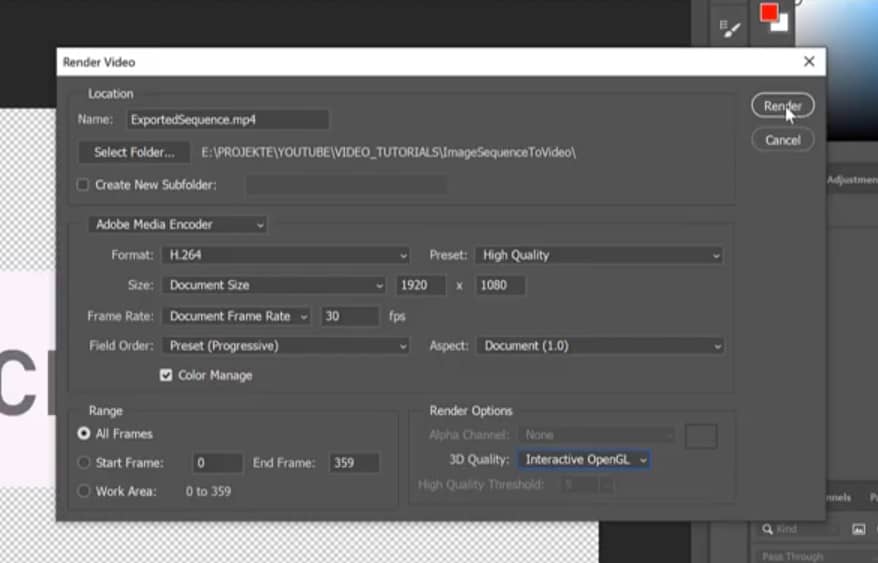
To export it, you will go to the ‘File’ menu and select: ‘Render Video’, to open the dialog box.
In the dialog box, you will set the properties of the video, like: name, format, preset, size, frame rate, aspect, 3d quality etc…

After you decide about all of the options, hit the ‘Render’ button.
Wait for the video to complete successfully.
If you open the folder where you exported the video and open it, the video will play. In our case the video is about a subscribe button, that has a transparent background.
This option of Adobe Photoshop is very handy, when you need to quickly compile a video from an image sequence. If the image sequence is of .png files, you can also generate the transparency for the video.
The transparency allows you to import the video and include it in any other video, which suits a lot with the purpose of a subscribe button.
Questions? Leave then in the comments section below.
Thanks for visiting!
![]()


